I promised to share how was made my 'Hydraulic tiles 'block : Dutch Tiles quilt was called ,
I can't explain all the process, not almost in the way Corey Yoder does...she explain in her book all what you need to do, all steps for a good success making petals applique , she is great , it worth it to buy the book !!
Regarding my Tiles quilt , have you ever seen flooring tiles that you wanted to make a quilt with the pattern shown ??
I did, many times in old churches , in old floors of Modernist houses in Barcelona ..it remembers me new patterns for quilts to do. I took photos many times, and at the end ,this book allow me to make it in a proper manner
Once I bought the Corey Yoder's book ' Playful petals' I started testing with others prints fabrics from my stash , measured and final block are the same 12 1/2 inches.
I used paper backed fusible web..if it is lightweight that's ok for cotton fabric , but if it is a bit thick consider to trim the centre fusible of the petal at the back , this eliminates extra bulk.. (do see at the pics )
Also you will iron open seam allowances for the petal , so that makes a nice block
Starting now to show the way ...follow me please !
**But beforehand IMPORTANT TIP ask yourself what do you want to get a HIGHLIGHTED square or a highlighted circle , which is your preference ? do see what I mean:

do see the difference , I will show you that one but my final decision was to make much more remarcable the circle at the Tiles quilt , this one :

1- Making the block (12 .5 " final ) do make first the background :
 Cutting diagonally 6 7/8 inches square you will get 2 HST for the sides..repeat for the 2 sides more untill get 4 sides of the 9" blue square ..this is the basics of the block


2- Making 4 petals for the block by combining 4 dark prints with 4 lighter colours in order to get contrast :

Sew together 1 of each 1/4 seam allowance always ..press seams open
 **IMPORTANT ....before to cut the petal shape ...should be added fusible web at the back of the 2 strips joined by an open and press seam allowances


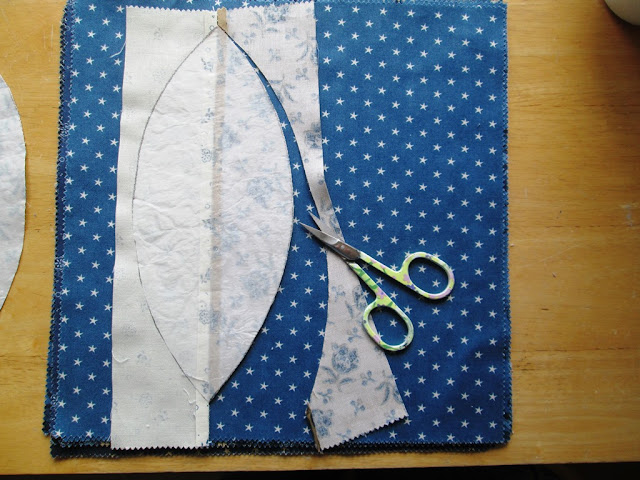
This is a lightweight fusible web...no need to trim at the back , but ...
avoid multiples layers by cutting the centre of the fusible web petal if it is thick , you will need only sticky fabric around the petal before to make blanket stitch , after finished block
do see here a closeup what I mean :
Bellow the thick one :
 Cut the centre before iron it at the 2 strips fabrics ... voila !


Hope that helps to encourage some of you to make one of those, choose your fabrics , your favourites colours and have fun by playing as a child with geometry
**Addendum: a small summary of my Dutch tiles block , see how:


Happy sewing winter room !
I can't explain all the process, not almost in the way Corey Yoder does...she explain in her book all what you need to do, all steps for a good success making petals applique , she is great , it worth it to buy the book !!
Regarding my Tiles quilt , have you ever seen flooring tiles that you wanted to make a quilt with the pattern shown ??
I did, many times in old churches , in old floors of Modernist houses in Barcelona ..it remembers me new patterns for quilts to do. I took photos many times, and at the end ,this book allow me to make it in a proper manner
Once I bought the Corey Yoder's book ' Playful petals' I started testing with others prints fabrics from my stash , measured and final block are the same 12 1/2 inches.
I used paper backed fusible web..if it is lightweight that's ok for cotton fabric , but if it is a bit thick consider to trim the centre fusible of the petal at the back , this eliminates extra bulk.. (do see at the pics )
Also you will iron open seam allowances for the petal , so that makes a nice block
Starting now to show the way ...follow me please !
**But beforehand IMPORTANT TIP ask yourself what do you want to get a HIGHLIGHTED square or a highlighted circle , which is your preference ? do see what I mean:

do see the difference , I will show you that one but my final decision was to make much more remarcable the circle at the Tiles quilt , this one :

1- Making the block (12 .5 " final ) do make first the background :


2- Making 4 petals for the block by combining 4 dark prints with 4 lighter colours in order to get contrast :

Sew together 1 of each 1/4 seam allowance always ..press seams open


This is a lightweight fusible web...no need to trim at the back , but ...
avoid multiples layers by cutting the centre of the fusible web petal if it is thick , you will need only sticky fabric around the petal before to make blanket stitch , after finished block
do see here a closeup what I mean :
Bellow the thick one :


**Addendum: a small summary of my Dutch tiles block , see how:


Happy sewing winter room !


.JPG)
.JPG)

.JPG)


